Though I can't really go into depth, I will say that this required only a single 1 second buffer, with about 10 different play-heads moving along it at various speeds, as the buffer was being recorded to live, with feedback through an open speaker loop. Since almost everything you are hearing was made through processed live recordings of my voice, I must say that I will NOT be doing this again for a bit. It hurts your voice a lot :X
What is neat about this is that it was done entirely live, no post-processing, which means that this kind of buffer-based processing would work well in a concert setting; I should look further into this in the future :)
link: http://ge.tt/93l08iH/v/0
Showing posts with label noise. Show all posts
Showing posts with label noise. Show all posts
Tuesday, May 15, 2012

Tuesday, June 14, 2011
Synthesis Tutorial!
I was on reddit, when I came across a post asking to explain the basics of digital audio synthesis... So I went a bit overboard and made a pretty nice introduction-to-synths post, and I thought I might want to post it here, in case it might be of use to any of my readers.
Note that it is only slightly edited, so if anything seems odd, keep in mind it was meant to be a response to a reddit users query.
Ok, now, Enjoy :)


Note that it is only slightly edited, so if anything seems odd, keep in mind it was meant to be a response to a reddit users query.
Ok, now, Enjoy :)
Hiya, I am a synthesizer enthusiast and noise musician, and I would be happy to write you a basic tutorial on how audio synthesis works, since most of the answers here will probably be more about the musical aspect of things, and less technical then it should be. Synthesizers can be complicated, but they are really really fun, and I hope this tutorial can help you understand how a synth works! :D
Ok, so, you can think of a synthesizer as an instrument that you build while you play it (yes, seriously!). So, synthesizers can have many, many sounds, and unless I know exactly what you are looking for, I can't tell you exactly what to do, but I will tell you this:
EXPERIMENT, TRY DIFFERENT THINGS, AND DON'T BE AFRAID TO MESS UP!!!
Not only is it insanely fun, but it helps you become better at understanding how to mold sound into what you want it to be, even if you dont understand technically what you are doing. Many synth players don't even know music theory, they simply understand their synth like the back of their hand, and then do what sounds good.
Alright, that aside, I will give you a basic tour of a standard synthesizer... It may get a little wordy, but this understanding is important!
ANATOMY OF A SYNTHESIZER
The standard hardware (analog) synthesizer has a collection of "modules", interconnected, to synthesize. In it's most bare basic form, it would be:
Oscillator(s) > Filter(s) > Effects
This is nearly the most basic synth that you will find, though it still has almost infinite possibilities! Let me explain these components:
OSCILLATORS
If you have ever seen people talking about recordings, or music, or what have you, you have probably seen this as a representation of a wave:

This is basically instructions for the speaker, in graph form, on how to make a sound called a "Sine Wave", the simplest of all sounds, a pure tone. The X axis in this graph is time, and the Y axis is the position for the speaker's membrane to be in at that specific time. If this confuses you, don't worry, just keep moving on, you will get it in time!
Highly technical aspects aside, the "Oscillator" is the sound-making unit of the synthesizer. Without the Oscillator, there would be NO SOUND. No other part of the synth actually creates sounds, it merely processes and changes the existing sound, created by the Oscillator. So, as you can see, the Oscillator is EXTREMELY important! The Oscillator can create many different sounds, but they generally sound very constant and toned, like the sounds made by old video game consoles. Here are some pictures of waveforms, the shapes these waves make, and explanations of what they sound like:
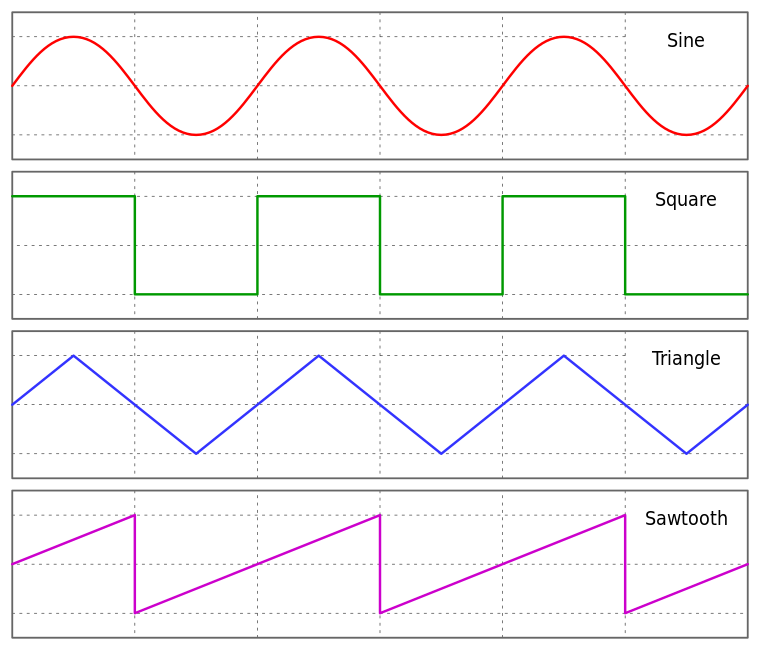
These are the most common periodic (toned) waveforms that you will find on your average synthesizer, though there are many many more out there. As you can see, they are often named after their wave's shape, but let me give you a few side notes on the properties of these waves:
- Sine waves, as I said earlier, are the purest a tone can possibly be. It has no "harmonics", or extra tones, which makes it sound very simple and smooth. It is used very much in additive synthesis, which will be explained later.
- Square waves are very harsh, and contain many harmonics, making it a good canidate for subtractive synthesis, which will also be explained in a bit. Pure square waves are a bit loud sounding, but have been used very often in classic videogames, such as the NES, which had a build in dedicated Square Wave synthesizer, which was used for well known game themes like the theme song to Super Mario Bros!
- Triangle waves are the least used of these 4, but they still certainly have their place! Several game consoles have used this as a substitution for a pure sine wave, because it is simpler to create, while still having a similar tone.
- Sawtooth waves, like Square waves, also have lots of harmonics, perfect for subtractive synthesis and filters. Sawtooth waves have a sort of "buzzing" sound
There is one more thing that basic oscillators can produce that I would like would like to go over, and that is, "Noise". "White Noise" is the most common, though there are almost infinite varieties out there. Unlike all the previous waveforms, white noise has no constant shape, and thus, no constant tone, either. You most likely already know what white noise sounds like, too! If you have not heard of it by name, try changing your television to a channel with no input, and you will see black and white dots and hear a sound like "SHHHHHH". That is noise! Noise is really good for filtering, and filtered noise waves can make really good percussion sounds, like snare drums or high hats.
METHODS OF SYNTHESIS AND FILTERING
Alright, now we have our electric piano keyboard plugged into our oscillator, and we are making tones and noise with these basic waveforms, on their own or in combination with each other, but it sounds a bit boring! What can we do to change these sounds to make them more interesting? Lets try using some classic synthesis methods!
There are several methods of synthesis in popular use, and unless you are using some very odd and obscure experimental synth, it will probably use one of the following, or a combination of these methods:
- Addative Synthesis
- Subtractive Synthesis
- Granular Synthesis
Granular Synthesis might be a bit too complicated for this explanation, but if I get a positive enough response, or you want me to explain it, I would be happy to put out the basics to you :)
So, what happens when we add two different waves or sounds together? We get additive synthesis!
Additive synthesis is done by adding very basic waves and sounds together to create more complex ones. This can be done with the oscillator, combining several, or many different waveforms, and playing them all at once, at different pitches and levels, or somewhere else on the synth, combining together hundreds of Sine waves to create entirely new shapes!
Here is a good visual representation of how additive synthesis works:

As you can see, three different sine waves, playing at different speeds, or pitches, are put together to create a whole new shape! Neat, huh? :)
What about subtractive synthesis? Well, I said something earlier about these things called "Harmonics". Harmonics are, basically, extra tones that add to the complexity of the sound of the waveform. Square Waves and Sawtooth Waves have lots of harmonics, Triangle waves have a few, and Sine waves have none at all! So, subtractive synthesis is using things called "filters" to manipulate the harmonics of a sound to create new tones.
We generally have several types of filters, and each of these have several parameters, or settings, that you can change. Don't get overwhelmed at how many there are, just absorb what you can, and play around with your own synth until you begin to understand them.
- Low-Pass Filter (LPF)
LPF's are filters that let only the harmonics lower than a certain point (the "cutoff" point) play, and reduces or eliminates all the harmonics higher than that point. LPF's can be used to make something sound "softer" or more "bass-y", and they are often used by dubstep producers to create a "wub-wub" sound, by moving the "cutoff" point back and forth very quickly (a process known as "modulation")
- High-Pass Filter (HPF)
HPF's are the exact opposite of LPF's, they work by keeping all the harmonics ABOVE a certain point, and quieting or eliminating the rest. They also have a cutoff point, just like low-pass filters, which is the point at which this cutting occurs. High pass filters can make things sound more tin-y, or they can be used to remove the bass frequencies from a sound
- Band-Pass Filter (BPF)
BPF's are like a combination of the two previous filters. They work by only letting a "band", a specific range of harmonics, through, and cutting off all the ones lower or higher than the this range. They have a wide variety of uses, experiment with it to see what you can use it for :)
- Equalizers
While not exactly a filter, per-say, Equalizers gives a synthesizer finer control over which harmonics you wish to emphasize, and which you want to quiet. Generally it gives you a variety of ranges, like "bass", "mid", and "high", and allows you to control each of them individually, enhancing or removing frequencies as you see fit.
These filters can be used to simply change the shape your oscillators can produce, or they can be "modulated", or have their parameters and settings (like "cutoff") changed over time, to create a more dynamic sound. This modulation can be done with an "envelope", a graph with an x axis of time and a y axis of value. Here is a visual example of a common envelope split into four sections, "attack", "decay", "sustain", and "release", also known as ADSR:

Envelopes can modulate other things, like how loud an oscillator is, or what it's pitch is, to create all sorts of neat possibilities. Fast envelopes can create percussive noises and hits, and long envelopes can create slowly morphing sonic textures, often known as "pads".
Parameters can also be modulated, believe it or not, with another oscillator! Dubstep producers, as I said earlier, create a "wub-wub" sound by modulating a low-pass filter's cutoff. This modulation is done via a very slow sine wave, moving the cutoff back and forth at a constant speed, in the same motion that the sine wave makes, up and down. This is usually called an "LFO", Low Frequency Oscillator.
Sorry if this is getting a bit complicated, like I said, just take in what you can, and experiment later on to see how different changes can effect the sound produced.
EFFECTS
There are thousands of different effects out there, and they can be very overwhelming, but just relax and try to wrap your head around a few of the most common (and most useful!) ones you will see, and their parameters (yep, effects have parameters too!):
- Delay/Echo
Delays take a sound created by your synth, play it, and then play it again at a later time, slightly quieter, and then repeat. This creates an echo effect. Some basic delay parameters would be "delay time" (how long it takes for the sound to be repeated) and "feedback" (how many times the sound is repeated, and how much quieter it gets on each repeat).
- Reverb
Reverbs create a spacious feeling, like making a noise or speaking in a large room or hallway. It gives the sound a more "live" atmosphere, and long reverbs can make a sound take much longer to fade than it would without the reverb. The most common reverb paramter would be "reverb time" (how long the sound is reverberating for)
- Flanger/Phaser/Chorus
These all work a bit similarly, but sound different. Without going into the highly technical features of these effects, they work by playing several copies of the same sound, all next to each other, at different speeds, to create different auditory effects. Flangers create an up-and-down wah type effect, phasers create a phasing sound often heard in alternative rock, and choruses make things sound more "wide", like a choir all singing the same note at different octaves. These effects generally have paramaters like "Delay time" and "Flange/Phase/Chorus Speed".
- Distortion
Many different types of distortion exist, but generally it makes the input sound harsher, noisier, and more intense. This effect is commonly used on guitars in rock music. Paramaters are generally simple, like "Distortion amount" and "Tone" (a built in equalizer that equalizes at the same time the distortion is performed).
- Equalizer
Remember this? Yep, some synthesizers consider this an effect, and not a filter. Weird, huh? It works well as both, though :)
END
Alright, at this point, your sound is sent from the effect to the speaker, and you have officially synthesized something! Yay!
I understand that audio synthesis can be tough to wrap your brain around, but if you managed to get your way through to the end of this tutorial, you already understand more about technical side of synthesis than many club DJs do! Cool!
Let me know if you have any questions at all about audio synthesis, and I would be happy to explain further, sorry if my explanations aren't perfect, I am not a teacher :s
Now, on the subject of buying synths, which I am sure many others have already covered... You have several options available, depending on your budget. There are hardware synths, which are special computers specially dedicated to synthesizing, which can range from 50 dollars for an old used casiotone, to hundreds of thousands for high quality moogs. You will have to look around, but I can vouch for the quality of Korg and Casiotone synths, if you'd like my opinion :p
Your other option would be software synthesis, which is using an existing computer (maybe the one you are on right now!) to synthesize things. There are many free software synths, one that I like would be ZynAddSubFX, which almost perfectly fits the scope of this tutorial, and has a build in virtual keyboard so you can use your normal computer keyboard like piano keys! You will have to explore to find other options, there are tons out there, have fun and look around!
Again, sorry if this didn't cover anything well enough, I hope it managed to help, though! :D
edit: added "distortion" to the effects list!
Saturday, April 23, 2011
Experimentation With Filtered Noise Signal
Using a resonant filter. It looks quite pretty in a spectrograph :)
http://www.mediafire.com/?atnu82mspaifhxq
http://www.mediafire.com/?atnu82mspaifhxq
Saturday, April 9, 2011
2 Other SC Projects
This one was all live coding, from start to finish: http://www.mediafire.com/?463m4ce7hgrrpty
This one was an experiment with the klang and klank objects: http://www.mediafire.com/?gi1ij41muop0mqa
Enjoy!
This one was an experiment with the klang and klank objects: http://www.mediafire.com/?gi1ij41muop0mqa
Enjoy!
Friday, April 8, 2011
Ring Onward (Supercollider)
Neato thingy I made in super collider, with the help of the super-nice <joshpar> on #supercollider, one of the actual developers of the program! It works by pushing the Ringing filter to its limits, using constant impulses (that popping sound you hear). Its my new genre! I call it: "Demonic Zombie Noise Trance"? :3
First, the code!
{
a = Pan2.ar(Mix.new(Impulse.ar([1,2])),0.0);
b = Mix.new(SinOsc.kr([0.1,0.3]));
a.postln;
c = RLPF.ar(Ringz.ar(a,a/2,b*0.5+2), 2500);
LeakDC.ar(Pan2.ar(Mix.new(Limiter.ar(c,1),0)))
}.play;
And now, the link to the MP3: http://www.mediafire.com/?blzmxbad3jrczst
P.S. 2 more supercollider experiments coming up! These won't have the code included, though :(
First, the code!
{
a = Pan2.ar(Mix.new(Impulse.ar([1,2])),0.0);
b = Mix.new(SinOsc.kr([0.1,0.3]));
a.postln;
c = RLPF.ar(Ringz.ar(a,a/2,b*0.5+2), 2500);
LeakDC.ar(Pan2.ar(Mix.new(Limiter.ar(c,1),0)))
}.play;
And now, the link to the MP3: http://www.mediafire.com/?blzmxbad3jrczst
P.S. 2 more supercollider experiments coming up! These won't have the code included, though :(
Tuesday, April 5, 2011
SuperCollider Livecoding Session 1 Results
Thought i'd upload a quick livecoding session of mine. I didn't think to record it till the very end though, so this is just the final product, not the work leading to it. It runs for forever, but i only recorded a short snippet of it so you got the idea. Also, I forgot to save the sourcecode... sowwy :(
Enjoy the lil noises :)
http://www.mediafire.com/?ayedcq5wyvti78j
Enjoy the lil noises :)
http://www.mediafire.com/?ayedcq5wyvti78j
Thursday, March 31, 2011
DC Experiment
Sorry for not posting here for a while, just wanted to update to make sure you knew I wasn't dead, and show you a lil experiment i just did in about an hour. I wanted to see how DC offset could be used rhythmically, and here is my result:
http://www.mediafire.com/?856f8te935uzpua
I recommend listening to it once with headphones, once without, because of the low notes which change the experience. Also, check it out in a waveform editor like audacity, it is neato :)
http://www.mediafire.com/?856f8te935uzpua
I recommend listening to it once with headphones, once without, because of the low notes which change the experience. Also, check it out in a waveform editor like audacity, it is neato :)
Tuesday, March 15, 2011
dreamingonawonderfulcloud
yeah, anyone who can listen to this entire track with their headphones on full blast earns my respect (but i will not pay for the ear surgery). no input feedback loop, this time incorporating my diabolical first supercollider patch, which can seriously blow your eardrums if used incorrectly. its open source, so, uhh, here ya go:
SynthDef(\feedback, {arg delaylength=1, amp=1; Out.ar(0,DelayN.ar(In.ar(8,2),10,delaylength.lag,amp.lag))}).add;
{var feedback1, w, slid2d, csx, csy;
feedback1 = Synth(\feedback);
csx = ControlSpec(0.01, 9.95, 0, 0.01, 5);
csy = ControlSpec(0, 5, 0, 0.01, 1);
w=Window("No Input Feedback", Rect(600,300,200,200));
slid2d= Slider2D(w,Rect(5,5,175,175));
slid2d.action_({feedback1.set(\delaylength, csx.map(slid2d.x), \amp, csy.map(slid2d.y))});
w.front;}.value
and, the track:
http://www.mediafire.com/?g8hmy6bnnfv9ewl
(seriously folks, play this with the sound down REALLY low. it might damage your ears, or, even worse, YOUR EQUIPMENT!) :O
<3 artificialcuttlefish
SynthDef(\feedback, {arg delaylength=1, amp=1; Out.ar(0,DelayN.ar(In.ar(8,2),10,delaylength.lag,amp.lag))}).add;
{var feedback1, w, slid2d, csx, csy;
feedback1 = Synth(\feedback);
csx = ControlSpec(0.01, 9.95, 0, 0.01, 5);
csy = ControlSpec(0, 5, 0, 0.01, 1);
w=Window("No Input Feedback", Rect(600,300,200,200));
slid2d= Slider2D(w,Rect(5,5,175,175));
slid2d.action_({feedback1.set(\delaylength, csx.map(slid2d.x), \amp, csy.map(slid2d.y))});
w.front;}.value
and, the track:
http://www.mediafire.com/?g8hmy6bnnfv9ewl
(seriously folks, play this with the sound down REALLY low. it might damage your ears, or, even worse, YOUR EQUIPMENT!) :O
<3 artificialcuttlefish
Friday, March 11, 2011
amb143
a special, nearly half hour long feedback loop project. no input, lots of effects. check it out!
http://www.mediafire.com/?dvo3bfbniyh3h3o
i am really enjoying these, i am actually considering making an album of them :D
more on that later, maybe :3
http://www.mediafire.com/?dvo3bfbniyh3h3o
i am really enjoying these, i am actually considering making an album of them :D
more on that later, maybe :3
Wednesday, March 2, 2011
Lofi Keyboard Granulation Through Meapsoft
Heyo, haven't posted here for a bit, sorry bout that :(
I recently found a program called Meapsoft that's been all the rage with the kids these days, so I gave it a shot, and I gotta say it is awesome! Basically, it does the things it does in three main steps:
1. Cut the input soundfile into bite sized pieces (anywhere from 2 pieces to 50000) based on your instructions (either based upon beats per minute, which it detects automatically, or based on whenever it breaks a specific threshold and makes a noise).
2. Take the resulting lil pieces, and assign number(s) to them. What numbers, you say? Well, lots of different numbers! You get to choose, too! For example, I could choose to assign each lil piece we cut up in last step a number based on how loud it is. Or maybe I could base it in the overall pitch of the piece as a whole. Or maybe go even further, and assign each piece its entire frequency spectrum, assigning an array of numbers to each piece!
That is all well and good, but pieces with numbers are not very interesting... but now, we will see what those numbers are for!
3. Organize the pieces based upon the numbers we assigned in step 2! There is a large variety of ways to organize, just as there was a large variety of ways to numbers the pieces. For example, we could sort it in order of smallest to biggest, or from biggest to smallest, or we could scramble them by swamping them with other pieces with similar numbers; there are LOTS of possibilities, especially if you combine them with all the different ways you can number the pieces you are sorting!
It is really a very simple program, with great applications, and it is very fun to use. I recommend trying it yourself, and checking out the examples on their site.
Here are the results of me messing around for a while with a 5~ minute piece I played on a Yamaha keyboard, running through my distorted amp, running through a phaser and a few rack effects on my computer:
http://www.mediafire.com/?kk3jbp8vc8opi50
Enjoy!
Monday, February 14, 2011
Lossyness, Part 2: MP3
This time, a very short experiment in the lossy audio format, mp3. A simple "Amen Breakbeat" has been looped, and each time it loops an extra level of compression/optional downsampling is applied to the beat. The results are quite interesting, the final steps being very difficult to hear due to low frequency response. To save you some times in downloading, I have mixed the entire collection of breaks into one high bitrate mp3 file; Keep in mind that, despite the lower rate tracks have been resampled to a higher rate, rest assured that the distortion to the sound is kept intact.
Download the compressed goodness here: http://www.mediafire.com/?eab7jclhrwgvq75
Enjoy!
Download the compressed goodness here: http://www.mediafire.com/?eab7jclhrwgvq75
Enjoy!
Ate
My newest feedback piece. Sorry, no diagrams for this, these loops are getting bigger and bigger. I added several effects, an equalizer, and a pure data patch into the cycle. This is my favorite one so far!
Download here: http://www.mediafire.com/?oo2g6v9yiu5ak9t
Download here: http://www.mediafire.com/?oo2g6v9yiu5ak9t
Sunday, February 13, 2011
Feedback Loop: Pulses
A new no-input feedback piece, made specially for you! This time, I added a cheapo guitar amplifier to the mix, and increased the delay to a point where you can hear each individual cycle, making a sort of "pulsing" pattern! The Amplifier has several controls: Gain Knob, Volume Knob, Boost Button, Treble Knob, Mid Knob, and Bass Knob.
Check out the diagram (Click the diagram for full size):

And now, the download:
http://www.mediafire.com/?01mgms20ndatmc0
Enjoy :)
Check out the diagram (Click the diagram for full size):

And now, the download:
http://www.mediafire.com/?01mgms20ndatmc0
Enjoy :)
Feedback Loop (Now with INPUT!)
Just did a neat variation on the feedback loop I was using earlier, adding a bit of actual INPUT to the loop, and then working with the resulting noise loop, trying out different ideas while avoiding having it blow up in my face: Fun!

The Jack patch, for those interested, since these things are getting a bit complicated (and will only get more complicated!) I have put it in a neat diagram form (yay, diagrams for stupid people!):
Hopefully that helps :)
As you may have noticed from the diagram, the input that I chose to use for this experiment was, in fact, the infectiously catchy theme song to the TV show "Duck Tales". Download it here:
http://www.mediafire.com/?1adtllxod4wjr18
Enjoy!
EDIT: I forgot to mention this in the diagram, but the effects used are a volume control, a bandpass filter, and a reverb. Simple, but it is awesome how much variation can come from just making teeny adjustments to these controls :)
EDIT: I forgot to mention this in the diagram, but the effects used are a volume control, a bandpass filter, and a reverb. Simple, but it is awesome how much variation can come from just making teeny adjustments to these controls :)
Saturday, February 12, 2011
Feedback Loop (Part 2!)
My Second No-Input Feedback Loop, this time the patch is:
System > Jack Rack [1] > Calf Filter > Jack Rack [2] > System
The first jack rack runs an amp and a reverb, the second jack rack just delays the sound, so that the loop takes longer to get back to the input (gives me a bit more control)
Link:
http://www.mediafire.com/?tovqrv324x2a3wp
Keep in mind, there is NO INPUT for this entire piece!
The only input is the output!
Enjoy!
System > Jack Rack [1] > Calf Filter > Jack Rack [2] > System
The first jack rack runs an amp and a reverb, the second jack rack just delays the sound, so that the loop takes longer to get back to the input (gives me a bit more control)
Link:
http://www.mediafire.com/?tovqrv324x2a3wp
Keep in mind, there is NO INPUT for this entire piece!
The only input is the output!
Enjoy!
Jack Feedback Loop
Inspired by my discovery (several months or so ago), and following fascination with Toshimaru Nakamura and his No-Input Mixing Board, I set off to see if I could try my own hand at this unique style of sound-art... Only one problem: I don't have a mixer!
Yeah, yeah, shame on me for not having a mixer, but, being the digital experimenter that I am, I opened up jack, got out some splitters, adapters, wires, and my trusty headphones, and got to work. After only a small amount of plugging in, I got a nice feedback loop going, while at the same time having my headphones so that I could monitor everything going on. I patched System > Jack Rack > System, opened up audacity, and made a quick example to test the possibilities of this technique, and of course, show it off on my blog ;)
Here is the example (keep in mind it gets quite loud, be careful!), quickly thrown together, mind you:
http://www.mediafire.com/?lka13u1otil3a4q
I am very much looking forward to trying all different ideas and effects to see how far this technique can really go! :D
Yeah, yeah, shame on me for not having a mixer, but, being the digital experimenter that I am, I opened up jack, got out some splitters, adapters, wires, and my trusty headphones, and got to work. After only a small amount of plugging in, I got a nice feedback loop going, while at the same time having my headphones so that I could monitor everything going on. I patched System > Jack Rack > System, opened up audacity, and made a quick example to test the possibilities of this technique, and of course, show it off on my blog ;)
Here is the example (keep in mind it gets quite loud, be careful!), quickly thrown together, mind you:
http://www.mediafire.com/?lka13u1otil3a4q
I am very much looking forward to trying all different ideas and effects to see how far this technique can really go! :D
Friday, February 11, 2011
Databending Roms, Introductions
Hi, my name is artificialcuttlefish, and I like to try new things, especially things involving sound, in combination with 1s and 0s. I am always learning and creating new things, so stay tuned for the wacky hijinks that shall ensue :)
A quick resume of my past audio experiments: I have previously worked under the name of A Salmon Of Questionable Morals. Under that name, I released 2 albums:
Both of them are free, and both of them are also quite loud, so be careful to not damage your ears!
I use many different methods, software/hardware, and production types, some of the many are listed below:
Live Coding
Renoise
Circuit Bending
Databending
Supercollider
Pure Data
Jack (!)
Audacity
And many more :)
A quick note about this blog: Don't expect regular updates. This is kinda an experiment for me, because every other blog I have had in my entire life has ended with 2 posts and 0 followers... I am just hoping that this one will at least be a good place for me to keep my experiments, and allow others to see how they work, if anything.
Alright, now the topic promised databending roms, and so I shall show you!
I have been databending old game roms recently, just to see what kinda of neat glitches I could find. If that sentence didn't make any sense to you, let me explain:
ROMs, or "Read Only-Memory" files, are files that are used to store the information for video games. They contain all the information that is needed for the game to play, other than, of course, the console.
Databending is altering a file to make it glitch, crash, act differently, or even become a different file type all together!
So, you see, I am glitching these roms for the heck of it, and I have quite liked the results so far! I will be cataloging my results with these experiments for a while here, and in upcoming posts, so stay tuned! (I might even make a tutorial for any of you who would like to try it yourself!)
I just finished an experiment in which I messed around with the insides of a gameboy rom (file type .gb), specifically the rom of the classic game Pokemon Red. Here is a two minute sample of the results, taken from when the game starts up, to when it crashes and stops working:
http://www.mediafire.com/?6basgwj5islejkg
I will be using mediafire to host my audio/video uploads, by the way. It seems like it will work well.
If you were wondering what such an interesting glitch looks like, here it is for your visual enjoyment, in screenshot form:

No, I am afraid I do not know from where the suspicious numeral 5 came, it just sort of showed up. That is the screen that shows up, and there it remains until the game crashes, about 2 minutes inward, after a large array of very interesting sounds and melodies. I tried multiple times, and I must say this was my favorite, audio wise. Many of the others actually managed to be somewhat playable, despite some very strange glitches, such as a Professor Oak who could walk through walls and had the voice of a sparrow Pokemon. I regret not getting a screenshot of him walking through his bookcase while squawking like an angry bird. Alas, it is too late for that.
Anyway, tonight I will be experimenting with editing a rom from the famous Super Nintendo Entertainment System (SNES, file type .smc). Updates coming soon!
Subscribe to:
Posts (Atom)